So after about a year and a half of Hustler parts all over my garage, it has finally come far enough along that I can start posting about it and showing off some of the custom hack jobs and pictures. I had no idea what I was
Some of the steps I’ve taken to get this far:
-All new chains and bearings
-Sandblasted the entire frame and axles, the thing was a rust bucket.
-Repaired multiple large cracks and holes in the tub
-New chain tensioners
-New battery
-all new wiring and cables
-Rebuilt the t-20, bearings, seals and O-rings (still leaks, I need to crack it open again)
-Replaced the Rotax 400cc 2-stroke, It smoked pretty bad and around here lakes have banned 2-strokes anyway.
-Swapped it with a 670cc 22HP Predator Chinese motor. The swap was pretty clean but the exhaust was pointing the wrong direction so I had to cut and re-weld it.
-I had to rebuild the rear engine cover, previous owners hacked it up pretty good.
-I replaced and re upholstered the back seat.
-Made Aluminum diamond plate rear floor and kick panel
-Replaced the front bench seat with Razor bucket seats
-sealed and waterproofed the axels and other holes
-Painted all metal surfaces to keep it from rusting out again
To do still:
-Register the thing.
-Mount the 6 new Argo AT189 tires
-Come up with some sort of latch for the engine cover
-Wire up the winch
-LED Lightbar
-Sump pump


So seating the AT189 tires on the hustler stock rims was a chore. The rims are 11″ wide where the AT189 tires I got are 10″ (24″outer diameter). I figured that 1 inch wouldn’t be a problem and all my searches on this site didn’t say that they wouldn’t fit… after several failed attempts at blowing up my garage with a blow torch and starting fluid, the ratchet strap I had around the center was too puny and actually exploded shooting violently and dangerously 30 feet out into the street. I eventually was able to get 1 tire seated but I ended up going to a shop for the rest of them. Which still took a lot of work blasting them multiple times with the 5 gal air compressor dump valve thing. -nuts. Anyways, I got them all on and I am crazy excited to take it swimming for the first time.
I am also having a rough time registering this thing. There is no VIN so I have had to get a VIN inspection from an OHV dealer and then a VIN assignment inspection from the DMV here in NV and because it is a 4 seater I need liability insurance on it. I now have to send off the packet of all the forms to the state capital to get it approved and get an actual VIN assigned. Ugh we will see how that goes. I was able to get a boat tag for it this morning, after explaining what it is, the lack of VIN thing and no manufacturer capacity plaque, and where I got it, they were nice enough to issue me a Hull Identification Number (HIN) with the appropriate stickers and such. So now it’s a boat, but they were sure to mention that I can’t take it to Lake Mead (the nearest body of water for a long while) because they dont allow OHV’s so I’m ok to be on the water but I can’t unload it to drive it in…
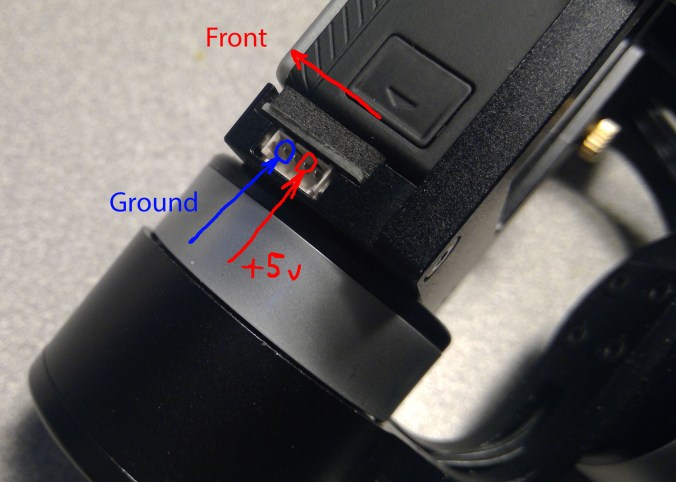
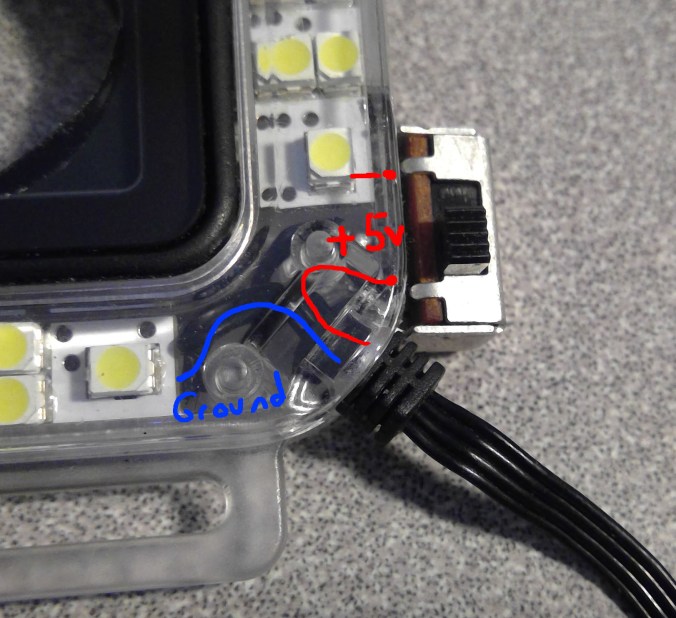 I soldered the switch pin directly to the back of the light where the original wire attached. Then I sandwiched the pins of the switch in-between the two halves of the light. I had to notch the plastic a little to get it to close.
